Keeping your computer running smoothly is crucial, and one of the most vital yet often overlooked maintenance tasks is replacing the CPU’s thermal paste. For gamers, content creators, and professionals pushing their machines to the limit, this simple step can make a world of difference.
A dried-out or worn-out layer of thermal paste can lead to CPU overheating, resulting in performance throttling, system crashes, and even permanent damage to your processor. This guide will walk you through the safe and easy process of cleaning and reapplying CPU thermal paste to keep your PC in top shape.
Why is Thermal Paste So Important?
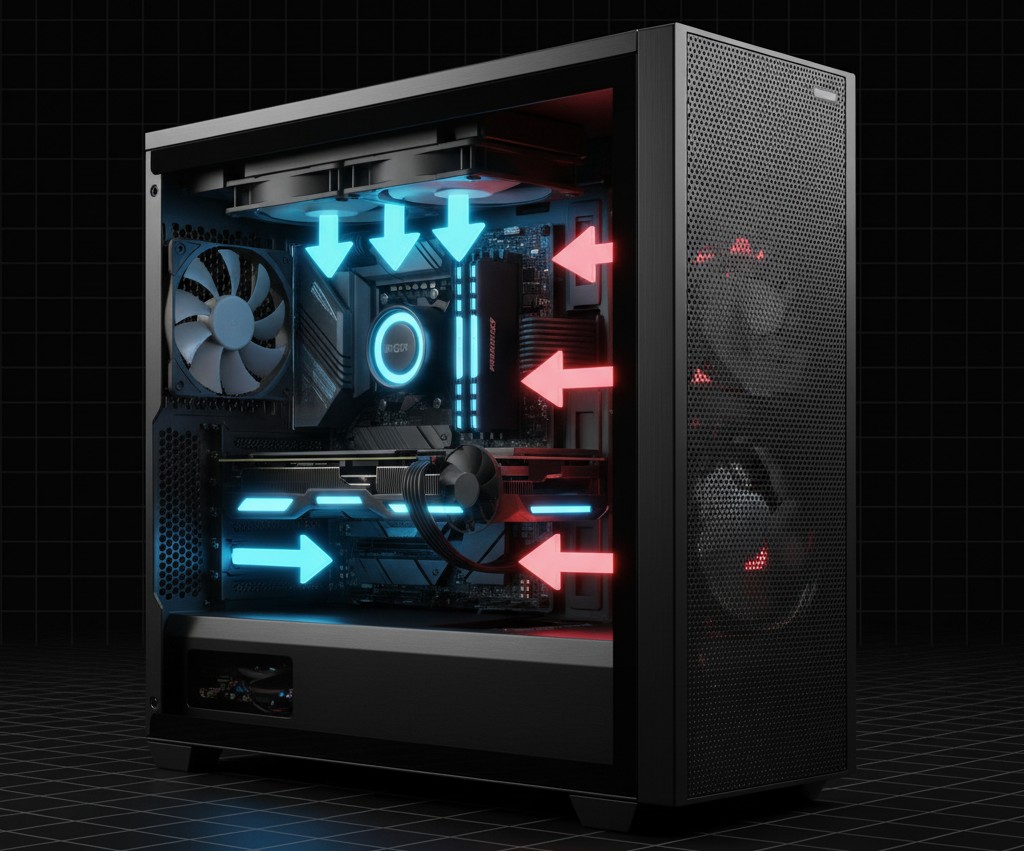
Your CPU generates a significant amount of heat while in operation. This heat needs to be efficiently transferred away to prevent the chip from overheating. That’s the job of the heatsink, a metal component (usually aluminum or copper) designed to absorb and dissipate that heat.
However, the surface of your CPU and the base of your heatsink aren’t perfectly smooth. On a microscopic level, they have tiny imperfections that create air gaps, which are terrible conductors of heat.
This is where thermal paste (also known as thermal compound) comes in. It’s a special substance that fills these microscopic gaps, ensuring a much more effective thermal connection between the CPU and the heatsink. This allows heat to transfer efficiently, keeping your CPU’s temperature within a safe range.
When Should You Replace Your Thermal Paste?
Not sure if it’s time for a refresh? Look out for these common signs:
- High CPU Temperatures: If your CPU temperatures are consistently high, even when the computer is idle or performing light tasks, your thermal paste may have lost its effectiveness. You can monitor temps using software like HWMonitor or Core Temp.
- Decreased Performance: Are you experiencing sudden performance drops, stuttering in games, or slower rendering times? If your hardware is otherwise fine, aging thermal paste could be the culprit causing your CPU to throttle.
- Excessively Hot Heatsink: While the heatsink is supposed to get warm, if it feels unusually hot to the touch, it might indicate that heat isn’t being dissipated correctly.
- After Removing the Heatsink: Any time you remove the heatsink from the CPU (for cleaning or other upgrades), you must clean off the old paste and apply a fresh layer.
- As a Rule of Thumb: Ideally, you should replace your thermal paste every 1-2 years, depending on the quality of the paste and how intensively you use your computer.
Tools and Materials You’ll Need
Before you begin, gather the following supplies:
- New Thermal Paste: Choose a high-quality thermal paste. There are many brands and types available, so do a little research and read some reviews.
- Isopropyl Alcohol (90% or higher): This is for cleaning off the old, crusty paste. A concentration of 90% or higher is recommended because it cleans effectively and evaporates quickly.
- Lint-Free Microfiber Cloth or Cotton Swabs: To apply the alcohol and wipe away the old paste without leaving any fibers behind.
- Screwdriver: The correct type for the screws or mounting mechanism on your CPU heatsink.
- (Optional) Anti-Static Wrist Strap: To protect your components from electrostatic discharge (ESD).
- (Optional) Small Flashlight: To get a better view inside your PC case.
Step-by-Step: How to Replace CPU Thermal Paste
1. Power Down and Unplug: Completely shut down your computer. Turn off the power supply unit (PSU) switch on the back and unplug the power cable from the wall outlet. This is a critical safety step.
2. Remove the Heatsink: Open your computer case and locate the CPU heatsink. Carefully detach it from the motherboard by releasing the retaining clips or unscrewing the mounting screws. If it feels stuck, gently twist it to break the seal of the old paste—do not pull it straight up with force.
3. Clean Off the Old Paste: Apply a small amount of isopropyl alcohol to your microfiber cloth or a cotton swab. Gently rub the surfaces of the CPU and the heatsink base to remove all traces of the old thermal paste. Repeat until both surfaces are perfectly clean and shiny. If the paste is very dry, let the alcohol sit for a minute to dissolve it before wiping.
4. Let It Dry: Allow both the CPU and heatsink surfaces to air-dry completely. The high-concentration alcohol should evaporate in a minute or two.
5. Apply the New Thermal Paste: There are several application methods, but the most common and reliable is the “pea-sized dot” method. Squeeze a small dot of new thermal paste—about the size of a small pea or a grain of rice—onto the center of the CPU. Do not spread it manually. The pressure from the heatsink will spread it evenly.
6. Reinstall the Heatsink: Carefully place the heatsink back onto the CPU. Mount it by tightening the screws or securing the clips. Apply pressure evenly by tightening screws in a diagonal (X) pattern, a little at a time, to ensure the paste spreads uniformly.
7. Final Checks: Double-check that the heatsink is firmly in place and that its fan cable is plugged back into the correct header on the motherboard.
8. Power Up and Monitor: Close up your case, plug everything back in, and turn on your computer. Use your monitoring software to check the CPU temperatures. You should see a noticeable improvement, especially under load.
Extra Tips for a Smooth Process
- Read the Manual: If you’re unsure, consult the manuals for your motherboard and CPU cooler for specific installation instructions.
- Less Is More: Applying too much thermal paste is counterproductive. An excessive layer can act as an insulator, trapping heat instead of helping it escape.
- Be Patient: Take your time with this process. Rushing can lead to mistakes. Work carefully and deliberately.
Final Thoughts
Cleaning and reapplying your CPU’s thermal paste is a simple but powerful way to maintain the health and performance of your PC. By following this guide, you can confidently perform this task and ensure your processor stays cool for years to come. Happy building!